
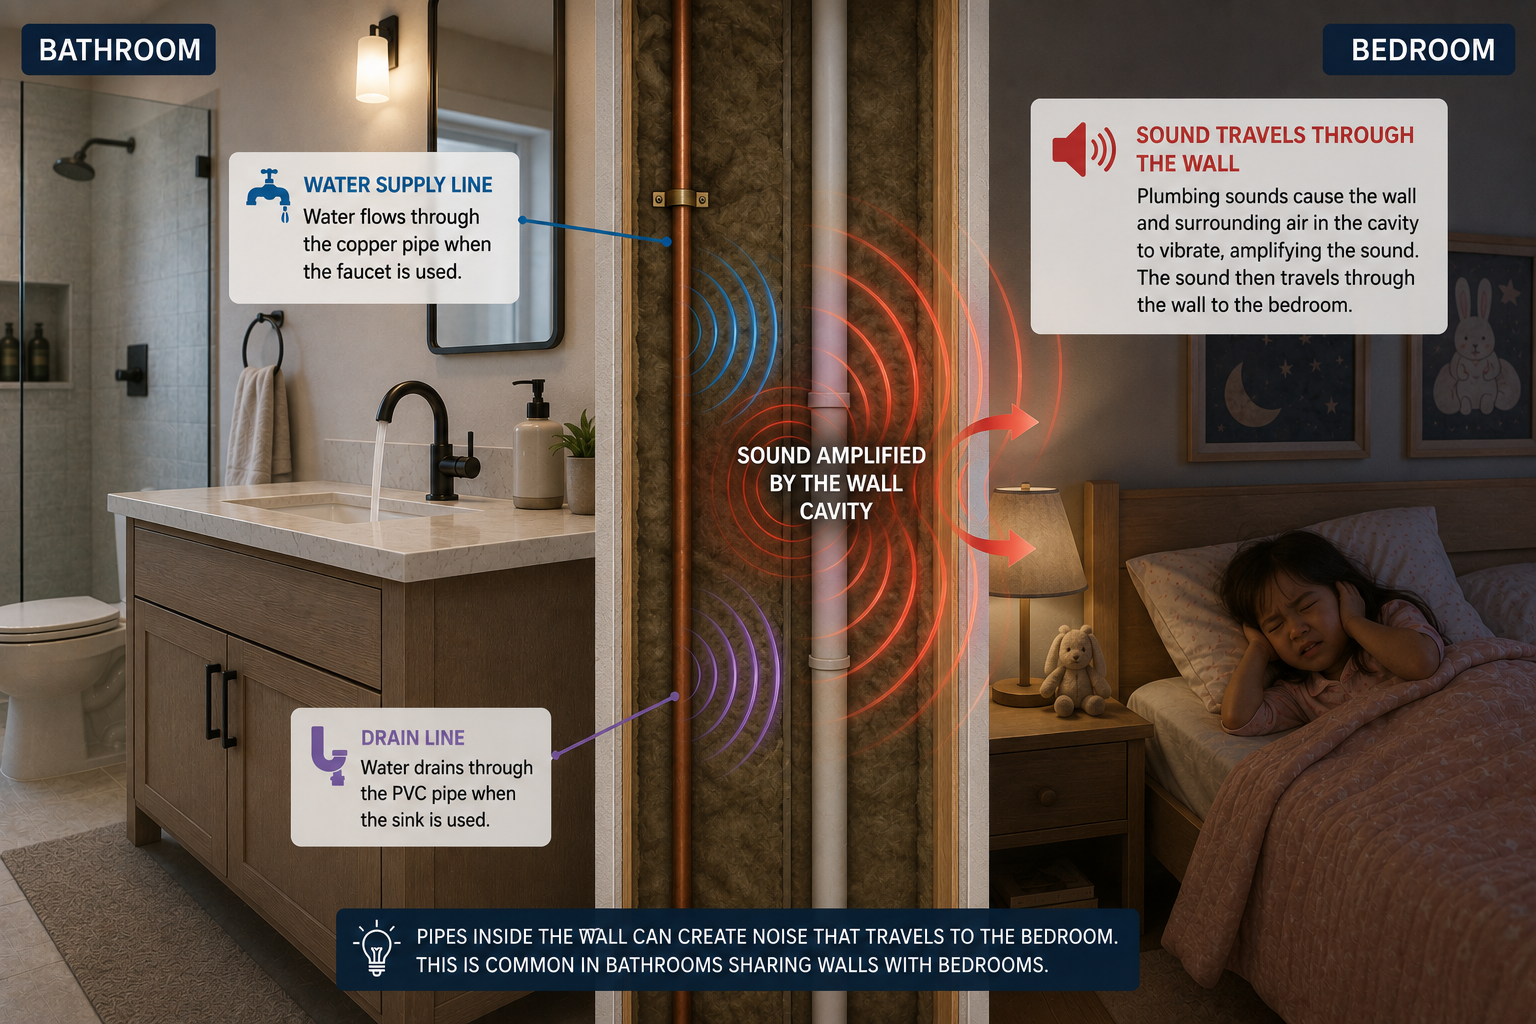
Most soundproofing advice focuses on blocking voices, television, music, or other airborne noise between rooms. A shared bathroom wall can be more complicated.
In this project, the bedroom shared a wall with a bathroom. The most annoying noise was not normal conversation from the bathroom. It was plumbing noise inside the wall: faucet water flow, toilet flushing, shower use, drain noise, and vibration from water moving through the pipes.
That matters because plumbing noise is not only an airborne sound problem. It can also be a structure-borne vibration problem. When water lines, drain pipes, studs, and drywall are tied together, the wall itself can become part of the noise path.
The solution was to open the bedroom side of the wall and rebuild it as a sound-control assembly using mineral wool, isolation clips, hat channel, two layers of 5/8-inch drywall, damping compound, and acoustic sealant. The finished wall still looks ordinary, but the wall behind it is much better at reducing everyday bathroom noise.
Quick Answer
To reduce plumbing noise through a shared bathroom wall, open one side of the wall if possible, inspect and support loose pipes, wrap accessible pipes where appropriate, fill the wall cavities with mineral wool, decouple the bedroom-side drywall with isolation clips and hat channel, install two layers of 5/8-inch drywall with damping compound between them, and seal every perimeter gap, outlet, and pipe penetration with acoustic sealant.
This will not make the bathroom silent. Toilet flushes, shower drains, and low-frequency pipe vibration may still be audible. But it can make running water sound duller, reduce the sharpness of toilet flushes, and make the bedroom feel noticeably calmer.

Why Bathroom Plumbing Noise Is Different
Before choosing materials, it helps to understand what you are trying to reduce. Bathroom plumbing noise usually reaches the bedroom in three ways.
1. Airborne Sound from Water Moving Through Pipes
Water turbulence creates sound inside supply lines and drain pipes. Some of that sound radiates through the pipe walls and into the hollow stud cavity. If the cavity is empty, it can behave like a small echo chamber.
2. Structure-Borne Vibration
Pipes can vibrate when faucets run, toilets refill, valves close, or drains carry water. If a pipe is touching wood framing or poorly supported, that vibration can transfer into studs and drywall. The drywall then acts like a large vibrating panel.
3. Wall-Cavity Resonance
A typical stud cavity is a long hollow space. Without insulation or sealing, it can reinforce certain frequencies instead of absorbing them. This is one reason plumbing noise can sound louder in the bedroom than you expect.
Because of these combined sound paths, foam panels on the bedroom wall will not solve the problem. Foam can reduce echo inside the bedroom, but it does not control pipe vibration, hollow cavity resonance, or sound leakage through gaps.

Most interior walls in American homes are simple 2×4 stud walls with a hollow cavity between two layers of drywall. Unless the cavity is insulated, it provides very little resistance to sound transmission. This is one reason plumbing noise, voices, and other household sounds can travel surprisingly easily through shared walls.
The Soundproofing Strategy
The retrofit used five acoustic principles.
| Principle | What it does | How this project used it |
|---|---|---|
| Source control | Reduces noise before it enters the wall | Inspect pipe contact, loose pipe movement, and penetrations before closing the wall |
| Absorption | Reduces sound reflections inside the stud cavity | Mineral wool insulation between studs |
| Decoupling | Interrupts vibration transfer from framing to drywall | Isolation clips and hat channel |
| Mass | Makes the wall harder for airborne sound to move | Two layers of 5/8-inch drywall |
| Damping | Reduces panel vibration between drywall layers | Damping compound between the two drywall sheets |
| Airtight sealing | Stops small gaps from leaking sound | Acoustic sealant around edges, boxes, and pipe openings |
Estimated DIY Cost Breakdown
Costs vary by region, wall size, brand, and whether you already own tools. For a bathroom-to-bedroom wall around 13 feet wide by 8 feet tall, this is a practical planning range.

| Item | Estimated quantity | Typical DIY cost range | Why it matters |
|---|---|---|---|
| Mineral wool insulation | 2 to 3 bags | $120 to $240 | Absorbs sound inside the wall cavity |
| Pipe insulation, wrap, or isolation material | As needed | $30 to $150 | Helps reduce pipe contact noise and water-flow noise |
| Pipe support adjustments | As needed | $20 to $120 DIY, more with plumber | Loose pipes can amplify faucet, flush, and shower noise |
| Sound isolation clips | 25 to 40 clips | $150 to $350 | Reduces vibration transfer from studs to drywall |
| 25-gauge hat channel | 8 to 12 pieces | $80 to $200 | Creates a decoupled mounting surface |
| 5/8-inch Type X drywall | 7 to 8 sheets for two layers | $175 to $320 | Adds mass to block airborne sound |
| Damping compound | 12 to 16 tubes | $250 to $450 | Reduces vibration between drywall layers |
| Acoustic sealant | 4 to 8 tubes | $40 to $120 | Seals perimeter gaps, pipe openings, and penetrations |
| Electrical box putty pads and extensions | As needed | $30 to $120 | Controls leaks around outlets and boxes |
| Drywall screws, tape, mud, primer, paint, texture | Project dependent | $100 to $250 | Needed for a finished wall |
| Tool rental or extra tools | Optional | $0 to $200 | Drywall lift, laser level, tin snips, sanding tools, PPE |
Estimated DIY materials total: about $995 to $2,520 for a wall this size.
If hiring labor: the total can easily move into the $2,800 to $6,000+ range, especially if you need plumbing inspection, drywall hanging, texture matching, and painting.
DIY Feasibility: Should You Do This Yourself?
This is a realistic DIY project for the wall assembly, but plumbing makes the decision more serious. Do not cut, move, or modify pipes unless you are qualified and your work is code-compliant.
Practical judgment: this is a medium-to-hard DIY project. The drywall work is manageable, but the details matter. One missed pipe contact point, one unsealed penetration, or one screw driven through the hat channel into a stud can weaken the result.
Step-by-Step Installation
Step 1: Document the Existing Wall
Before demolition, photograph the room, trim, outlets, and any visible clues about plumbing locations. Record before-construction videos from the same bedroom location while running the sink, shower, and toilet. These recordings are often more meaningful than phone decibel readings because the real question is comfort: is the noise still distracting when someone uses the bathroom?
Step 2: Open the Bedroom Side of the Wall
This project opened only the bedroom side. That allowed the bathroom side to remain untouched while giving access to the wall cavity, pipes, framing, and electrical boxes.
Once open, inspect for pipe contact, loose pipe supports, unsealed penetrations, and any sign of moisture. If you find leaks, corrosion, questionable fittings, or pipes that move when fixtures run, address those problems before soundproofing.

Step 3: Treat Pipe Noise Where Accessible
Soundproofing the wall helps, but plumbing noise should be reduced at the source when possible.
- Secure loose pipes with proper supports.
- Add pipe insulation or wrap where appropriate.
- Avoid rigid contact between pipes and the new drywall assembly.
- Seal gaps around pipe penetrations where allowed.
- Ask a plumber about water hammer arrestors or water pressure if pipes bang when fixtures shut off.
Do not bury an active plumbing problem behind a finished acoustic wall. Soundproofing should come after the plumbing is stable and dry.
Step 4: Improve Electrical Boxes
Electrical boxes are weak points in any soundproof wall. Where permitted, use acoustic putty pads around boxes, seal gaps with acoustic sealant, and add box extension rings if the finished wall thickness increases.
All electrical work should remain accessible and code-compliant. Do not bury junctions or rely on tape as a permanent fix.

Step 5: Install Isolation Clips
Lay out the isolation clips according to the manufacturer’s spacing instructions. Keep the clips aligned so the hat channels remain straight. This step matters because decoupling is one of the biggest differences between a real soundproofing assembly and a wall that simply has more insulation.Lay out the isolation clips according to the manufacturer’s spacing instructions. Keep the clips aligned so the hat channels remain straight. This step matters because decoupling is one of the biggest differences between a real soundproofing assembly and a wall that simply has more insulation.
Step 6: Install Hat Channel
Snap the hat channel into the clips and confirm the channels remain isolated from the framing. The new drywall will attach to the hat channel, not directly to the studs.

Step 7: Install Mineral Wool
Cut mineral wool slightly oversized so it friction-fits between studs. Split the batts around pipes and wires instead of crushing them. Fill every cavity as consistently as possible, including irregular spaces near the sloped ceiling or framing transitions.

Step 8: Hang the First Layer of 5/8-Inch Drywall
Fasten the first drywall layer only to the hat channel. Avoid driving screws through the channel into the studs behind it. Leave a small perimeter gap at the floor, ceiling, and side walls so the drywall does not create a rigid bridge to the surrounding structure.
Step 9: Add Damping Compound and the Second Drywall Layer
Apply damping compound to the back of the second drywall layer according to the product instructions. Stagger the seams so they do not line up with the first layer. Then fasten the second layer through the first layer into the hat channel, again avoiding the studs.
Do not substitute regular construction adhesive for damping compound. Construction adhesive becomes rigid; damping compound is designed to reduce vibration between layers.

Step 10: Seal Everything
Seal the perimeter gap, electrical boxes, pipe penetrations, and any remaining cracks with acoustic sealant. This is not a cosmetic detail. Small air gaps can leak a surprising amount of sound.
Step 11: Finish the Wall
Tape, mud, sand, match the wall texture, prime, and paint. If the bedroom wall has texture, practice before applying texture to the finished wall. A good acoustic assembly can still look like a bad repair if the texture does not match.
Before and After: What Changed
Before construction, bathroom use was easy to hear from the bedroom. The sink was clearly audible, shower noise was distracting, and toilet flushes were obvious. The hollow wall cavity made the water-line noise feel sharper than expected.
After the retrofit, the sink became much less noticeable, shower noise sounded more muted, and toilet flushes were substantially less sharp. The bedroom felt calmer during both daytime use and nighttime bathroom trips.
The result was not total silence. That is not a realistic promise for an existing bathroom wall with active plumbing. But the practical improvement in comfort was immediately noticeable.
Noise from flushing toilet, before and after comparison:
- Before:
- After:
Common Mistakes to Avoid
- Using foam panels: Foam controls echo inside a room, not plumbing noise inside a wall.
- Installing insulation only: Insulation helps, but it does not solve vibration, mass, or sealing problems by itself.
- Ignoring loose pipes: If pipes bang, move, or touch framing, fix that before closing the wall.
- Compressing mineral wool: A snug fit is good; crushing the batts is not.
- Skipping decoupling: Isolation clips and hat channel reduce vibration transfer.
- Forgetting acoustic sealant: Gaps around outlets, pipes, and edges can leak sound.
- Screwing into studs: This can short-circuit the decoupled wall assembly.
- Expecting lab-rated performance: Existing homes have flanking paths through floors, ceilings, framing, and plumbing.
Frequently Asked Questions
Will pipe insulation alone solve plumbing noise?
Usually no. Pipe insulation can reduce some pipe-radiated noise, but it will not fully solve framing vibration, hollow-wall resonance, or sound leaks around gaps.
Can this be done from one side?
Yes. This retrofit opened only the bedroom side of the wall. That gave enough access to improve the wall assembly without remodeling the bathroom side.
Is resilient channel acceptable?
Resilient channel can help when installed correctly, but isolation clip and hat channel systems are generally more predictable for DIY work because they create a clearer decoupled mounting plane.
Is mass-loaded vinyl necessary?
Not usually. Mass-loaded vinyl can add mass, but double 5/8-inch drywall with damping compound is often a better value for this type of wall retrofit.
Does this help drain pipe noise?
Yes, it can reduce drain pipe noise. Drain noise is often louder and more structural than simple airborne sound. Expect improvement, not total elimination.
Can shelves or cabinets be attached to the hat channel?
Only if the system is designed for those loads. Heavy items should not be casually attached to a decoupled soundproofing assembly.
Should I hire a contractor for part of the work?
Yes, that can be a smart compromise. Many homeowners handle demolition and insulation themselves, then hire a plumber for pipe concerns or a drywall finisher for the final texture and paint-ready finish.


Leave a Reply